
You have seen the photos. A tidy tray, a few objects arranged just so, a toddler sitting calmly and working through it like a tiny, focused adult. Then you try it at home and the objects end up on the floor in ten seconds flat.
The difference is rarely the materials. It is almost always the setup. A tray that actually holds a toddler’s attention follows a specific structure, and once you know that structure, you can build a new one in under five minutes using things you already own.
This guide walks through exactly how to set up a tray step by step, what mistakes derail it, how to adjust the approach as your toddler grows, and five ready to use tray ideas to get you started today.
What a Tray Actually Does
It is easy to assume the tray itself is decoration, the kind of detail that looks nice in a photo but does not matter much in practice. That is backwards. The tray is doing real work.
A tray creates a physical boundary. It tells a toddler, without a single word, where an activity starts and where it ends. Objects that spill past the edge signal that something needs to be picked up and put back, which is a small but real lesson in order. Without that boundary, a toddler treats a pile of loose objects as free range material, and focus tends to break down within a minute or two.
The tray also limits choice. A toddler looking at a full shelf of toys has to filter through dozens of options before landing on one, and that filtering is genuinely hard for a young brain still building the skills for decision making. A tray narrows the field to a single task, which is part of why toddlers often settle into tray based activities faster and stay with them longer than they do with an open toy bin.
None of this requires a special product. A baking sheet, a shallow box lid, or a placemat all work exactly as well as a $40 wooden tray from a specialty shop.
Why Toddlers Respond to Order
If you have ever watched a toddler insist that a specific cup goes in a specific spot, or melt down because a bedtime routine happened out of sequence, you have already seen this in action. Toddlers move through a stretch of early childhood where order matters intensely to them, more than it will again at any other age. A tray works with that tendency instead of against it.
Occupational therapists who work with young children often point out that the toddler years bring a real jump in what small hands can do, moving from simple grabbing to purposeful, controlled use of the hands as tools. A tray gives that developing control something specific to practice on, rather than leaving it to develop through scattered, unstructured play alone. Several parent educators and therapists have also noted a shift in recent years, with more children arriving at school with weaker hand strength and coordination than in the past, a trend some tie to a drop in the kind of repetitive, hands on object play that trays are built around, as loose parts and manipulable toys get replaced by screens and passive entertainment.
None of this means a single missed tray activity sets a child back. It means that a few minutes of structured, hands on practice most days adds up over months in a way that is easy to miss in the moment and easier to see in hindsight.
Step 1: Pick the Right Tray
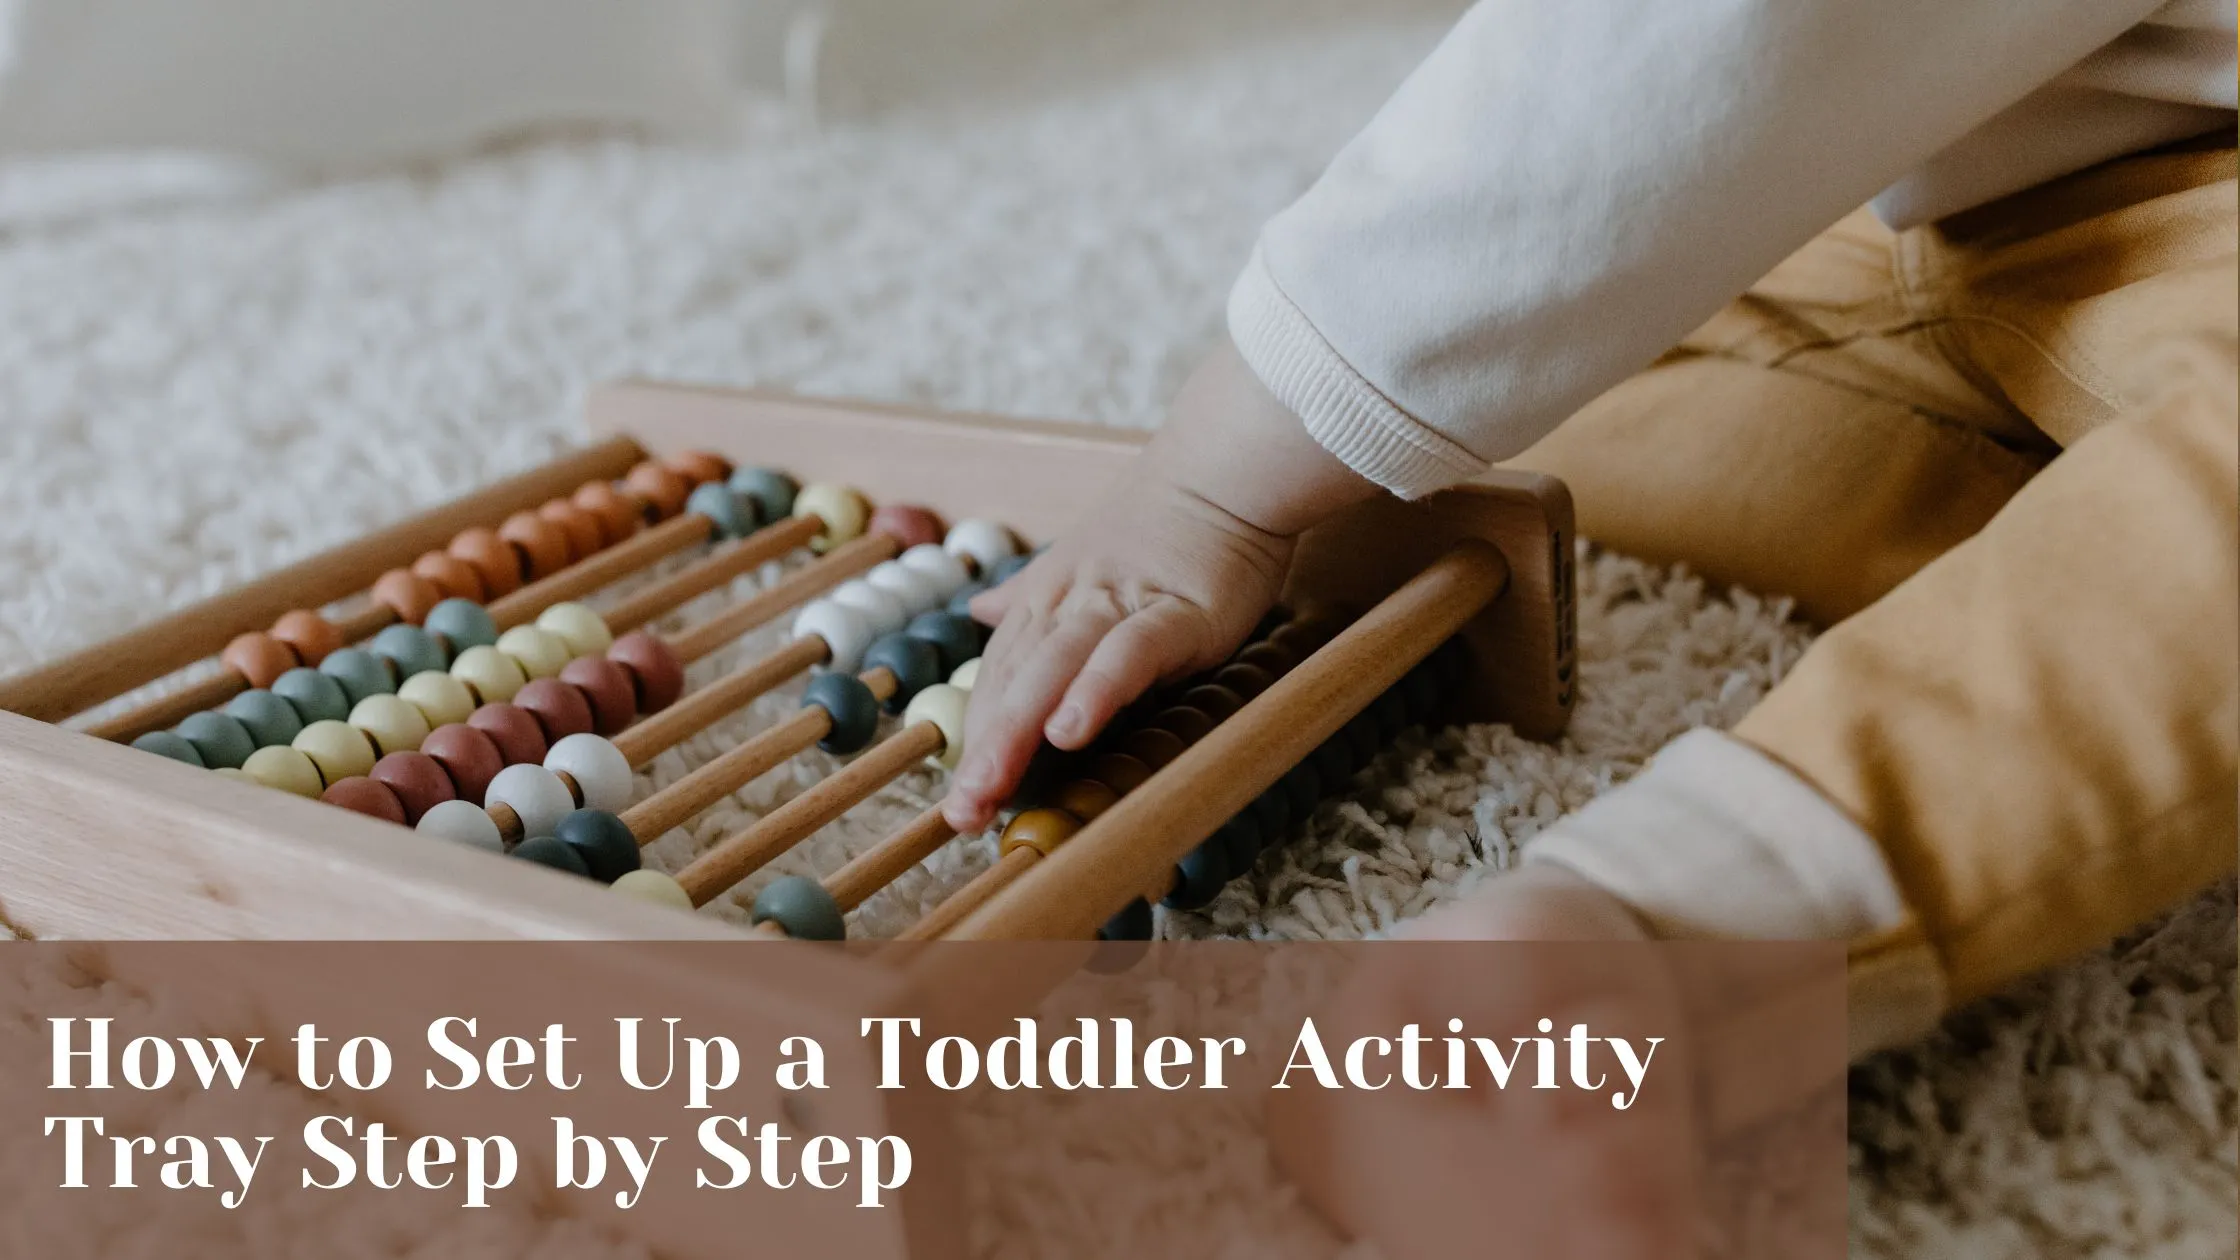
Start with size. A tray that is too large lets objects drift apart and roll off the edges, which turns the activity into constant retrieval instead of focused work. A tray that is too small crowds the materials together and makes the task feel cramped. A good rule of thumb is a tray roughly the size of a placemat, big enough for two or three small bowls with a little room to spare.
Material matters less than people assume. Wood looks nice and holds up to wear, but a plastic cafeteria tray, a rimmed baking sheet, or even a shoebox lid works just as well functionally. What matters is a raised edge, since that edge is what keeps small items from sliding away and gives the tray its boundary function.
Avoid trays with busy patterns, cartoon characters, or bright colors printed on the surface. A plain tray keeps the visual focus on the materials sitting on top of it rather than competing with them.
Step 2: Choose One Skill
Every tray should target exactly one skill. Pouring, sorting, threading, or transferring are all good single skill choices. Resist the urge to combine two or three skills into one tray, since that usually asks more of a toddler’s attention than they can manage at once and leads to a tray that gets abandoned halfway through.
Match the skill to where your toddler currently is, not where you want them to be. A toddler who has never used tongs will struggle with a tray built entirely around a pincer style tool. Start with the easiest version of a skill, whole hand transfers with a scoop, for example, before working toward the harder version, small object transfer with tongs.
Fine motor skill develops in a fairly predictable order through the toddler years. Around 15 months, most children can stack two or three blocks. By age two, that number rises to six or eight, and by three, many children can build towers of ten or more, according to developmental milestone data referenced by Lurie Children’s Hospital. Threading small beads onto a string tends to click into place a little later, usually between 20 and 23 months. Knowing roughly where your toddler falls on that timeline makes it much easier to pick a tray skill that is challenging without being frustrating.
Step 3: Gather Only What’s Needed
Once you have a skill in mind, keep the materials list short. Three to five items is the sweet spot: a container to pour from, a container to pour into, and maybe a small cloth for spills, for example. More items than that usually means more distraction rather than more learning.
Real materials work better than toy versions when it is safe to use them. A real small pitcher, real dried beans, a real cloth napkin, these give a toddler an accurate sense of weight, texture, and cause and effect that a plastic toy version cannot fully replicate. Save the plastic substitutes for situations where safety genuinely requires them, such as with very young toddlers who still explore new objects by mouth.
Check every item for choking hazards before placing it on the tray, and stay within arm’s reach any time small objects are involved, regardless of how independent your toddler seems.
It also helps to think about scale. Materials sized for an adult kitchen, a full sized pitcher or a large mixing bowl, are often too heavy or too awkward for small hands to manage well, which leads to frustration that has nothing to do with the actual skill being practiced. Look for a smaller pitcher, a lighter cup, or a shallow bowl instead. The goal is a set of materials your toddler can lift, carry, and pour without wrestling with the size or weight of the object itself.
Step 4: Arrange It Left to Right
This step gets skipped constantly, and it is one of the more useful ones. Arrange the materials on the tray so the task naturally flows from left to right, the same direction most toddlers will later read and write in.
For a pouring activity, that means the full pitcher sits on the left and the empty cup sits on the right. For a sorting activity, the mixed items sit on the left and the sorting bowls line up to the right. This is not just a fussy detail. Repeated left to right motion during play builds a physical pattern that shows up again later when a child starts tracking words across a page.
Keep the arrangement consistent each time you set out the same tray. A toddler who knows exactly where each piece belongs can reset the tray on their own once the activity ends, which is a small independence win worth building toward.
Step 5: Demonstrate Without Talking
Before handing a tray over, show your toddler how it works. Sit beside them, move through the task slowly and silently, and then place everything back exactly where it started. Narrating each move, “now I am pouring the beans,” tends to distract more than it helps, since a toddler is trying to watch your hands, not process a stream of words.
One slow demonstration is usually enough. Resist repeating it multiple times or over explaining what you just did. A toddler learns the motion by watching it once and then attempting it themselves, not by hearing it described in detail.
If your toddler reaches for the tray mid demonstration, that is a good sign, not a problem. Let them take over right away rather than insisting on finishing the demonstration first.
Step 6: Hand It Over and Step Back
This is the step most parents struggle with. Once the tray is handed over, the job is to watch, not to help. A spill, a dropped bead, a lid that will not quite fit, these are not failures to correct. They are the actual content of the activity.
Stepping in early to fix a mistake sends a quiet message that the task belongs to the adult, not the child, and it tends to shorten how long a toddler stays engaged rather than lengthen it. Instead, stay close enough to catch a genuine safety issue, and otherwise let the spill happen and the frustration pass.
If your toddler asks for help directly, offer the smallest amount possible, a single word of encouragement or a light touch to steady a container, rather than taking over the task. The goal is support, not rescue.
It can help to physically busy yourself with something small nearby, folding a napkin or sorting mail, rather than sitting and watching directly. A toddler who feels closely observed sometimes performs for an audience instead of settling into the task itself. Being present but quietly occupied tends to produce longer, calmer stretches of independent work than active, visible supervision does.
Step 7: Reset for Next Time
When the activity winds down, involve your toddler in putting the tray back together the same way it started. This closing step matters almost as much as the setup itself, since it teaches that an activity has a beginning and an end, not just an open ended free for all.
Store finished trays somewhere your toddler can retrieve them independently, a low shelf or an open bin works well. A tray that is easy to reach gets used far more often than one buried in a closet, and the ability to choose and retrieve an activity without asking for help is itself part of the point.
Set the Tray, Step by Step
Tap each step as you go. The marker moves left to right, the same direction you’ll arrange the tray itself.
Pick the right tray
Placemat sized, raised edge, plain surface. A baking sheet or box lid works fine.
Choose one skill
Pouring, sorting, threading, or transferring. Match it to what your toddler can do now.
Gather only what’s needed
Three to five real, right sized items. Check for choking hazards first.
Arrange it left to right
Full container on the left, empty one on the right. Keep it consistent every time.
Demonstrate without talking
Move through the task once, slowly and silently, then reset it exactly as it started.
Hand it over and step back
Let the spills happen. Offer the smallest help possible, only if asked.
Reset for next time
Put it back together with your toddler, then store it somewhere they can reach.
Adjusting Trays as Your Toddler Grows
A tray built for a 15 month old will not hold the interest of a 3 year old for long, so the setup needs to shift as skills develop.
Young toddlers, 12 to 18 months. Keep trays to a single, simple motion: pouring, dumping, or stacking two or three items. Materials should be large enough that nothing poses a choking risk, and sessions will likely be short, often under two minutes, which is completely normal at this stage.
Middle toddlers, 18 to 24 months. Add a light second step, such as pouring into a specific cup rather than any cup, or sorting into two labeled bowls instead of one. This is also around the age when small object work like bead threading starts to become manageable.
Older toddlers, 2 to 3 years. Introduce trays with a clear multi step sequence, such as folding a cloth in a specific pattern or completing a threading task with a set number of beads. Real tools like child safe scissors or tongs tend to fit well here, and a toddler at this age often wants to repeat a favorite tray many times before losing interest, which is a normal and useful part of mastering a skill.
Common Setup Mistakes
Too many items on the tray. More materials rarely means more engagement. It usually means a toddler abandons the task halfway through because there is too much to process.
Choosing a skill that is too advanced. If your toddler struggles for more than a few tries and starts showing frustration rather than concentration, the tray is likely a skill level too far ahead. Step back to an easier version rather than pushing through.
Talking too much during the activity. Constant narration, questions, or praise during the task tends to interrupt concentration rather than support it. Save comments for after the activity ends.
No consistent home for the tray. A tray that lives in a different spot every day is harder for a toddler to seek out independently. Give each tray a fixed, reachable spot.
Introducing too many new trays at once. One new tray at a time is plenty. Rotating in five new activities in the same week overwhelms rather than excites.
Setting up the tray in a high traffic area. A tray placed in the middle of a busy kitchen or living room competes with foot traffic, noise, and other distractions. A quieter corner, even a small one, gives a tray a much better chance of holding attention.
Five Tray Ideas to Start With
Pouring tray. A small pitcher of water or dried beans, an empty cup, and a cloth for spills, arranged left to right.
Color sort tray. A bowl of mixed colored pom poms on the left, two or three empty bowls on the right for sorting.
Lid match tray. Three or four containers with lids removed, lids mixed together in a small basket to the side.
Tong transfer tray. A bowl of pom poms or soft blocks, a pair of child safe tongs, and an empty bowl to transfer into.
Threading tray. A basket with a handle tied to a shoelace and a small dish of large wooden beads or dried rigatoni, sized to your toddler’s current pincer skill.
Folding tray. Two or three small washcloths stacked on the left, an empty basket on the right for the finished, folded stack, giving your toddler a clear sense of progress as the pile moves from one side to the other.
Quick Answers to Common Questions
How often should I change the tray activity? There is no fixed schedule. Watch your toddler’s interest instead of the calendar. A tray your toddler still returns to daily does not need to change. Once interest clearly drops, usually after a week or two, rotate in something new or vary the material inside the same activity.
What if my toddler ignores the tray completely? This happens, especially with a new activity or a new toddler to this style of play. Leave the tray in its spot without pressure and offer it again a few days later. Interest often builds gradually rather than appearing the first time a tray is introduced.
Do trays need to be used sitting at a table? No. A small rug or mat on the floor works just as well, and many toddlers actually prefer working at floor level. What matters is a defined, quiet space, not a specific piece of furniture.
Can two toddlers share one tray? Generally not well. Tray activities are built around individual, focused work, and sharing tends to create competition over materials rather than concentration. If two children want to work at the same time, set up two identical trays instead of one shared one.
Is it a problem if my toddler uses the tray “wrong”? Not usually. A toddler who stacks the pouring cups instead of pouring, or lines up the sorting bowls instead of sorting, is still engaging with the materials and practicing focus and hand control, just in a different direction than planned. Step in only if the activity turns unsafe, not simply because it turns unexpected.
How many trays should I keep available at once? Two or three is generally plenty for a toddler to choose from without feeling overwhelmed. A larger rotation stored out of sight and swapped in occasionally works better than a full shelf on permanent display.
The short version: one tray, one skill, arranged left to right, demonstrated once and then handed over. Everything else in this guide is detail in service of that same simple structure, and once it clicks, a new tray takes only a few minutes to put together.